How do you install Lightroom presets? – on both Mac and Windows
So you’ve downloaded some amazing preset and you want to learn how to install them? There are a few ways you can install Lightroom presets. Here are the steps that apply to both mac and windows users:
Method 1: Install Lightroom presets through LR Preferences (Most Common)
This is probably the most common way to add presets into Lightroom. This is also the preferred way to install Lightroom presets if you purchased or downloaded them from a different source.
The reason is, many times when you download presets, they will typically be organized for you in folders already. This method makes it easy to keep that same organizational system that the presets author created.
- Open Lightroom.
- Download or locate some Lightroom presets.
- Unzip the presets.
- Open the presets folder (Mac: in Lightroom’s top menu, click Lightroom > preferences. Windows go to Edit > preferences.
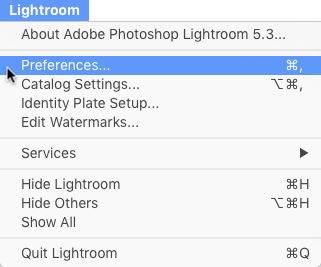
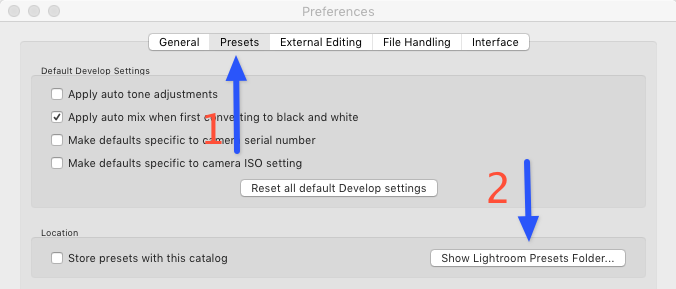
- Click on the Presets tab.
- Click on “Show Lightroom presets folder…” This will open up a new window showing you the Lightroom Folder.
- Open the Lightroom Folder and Locate the Develop Presets folder.
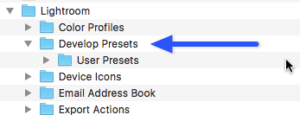
- Drag and drop, or copy and paste the presets that you downloaded.

- Restart Lightroom (close Lightroom, then open it back up).
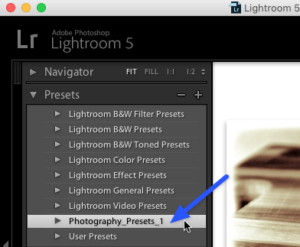
- You are done. You should now see your presets ready to use under the presets section in Lightroom develop module.
Method 2: Install Lightroom Presets via Lightroom Develop module
- Download or locate your Lightroom presets.
- Unzip them.
- Open Lightroom.
- Go to the Develop module in Lightroom.
- Expand the Presets area.
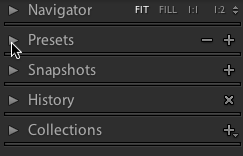
- Right-click in the lighter gray area.
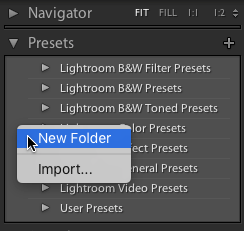
- Choose New Folder if you want to place the presets in a a new folder. Choose any name you see fit. You can also just click Import... to import the presets without any folders. (Tip: use folders to better organize your presets)

- After you’ve created a folder, right-click on that folder and click Import...
– a dialog box will open allowing you to find and choose your Lightroom presets.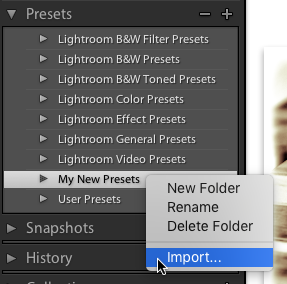
- You are now ready to use your presets (restart Lightroom if you have any issues).
Method 3: Install Lightroom presets through Finder and Explorer Windows
This is actually the quickest way to add presets, but it is a tiny bit more advanced. It uses a quick method of getting access to the preset folder file path. Of course you can also just click your way through the file path to get to your Develop Presets Folder.
MAC OS X users:
- Download / locate the presets.
- Unzip the presets
- Open a finder window (click the blue smiley face icon in the dock).
- Press the keyboard shortcut Command-Shift-G or go to Finder > Go > Go To Folder…
- Copy and paste the following file path: /Users/YOURUSERNAME/Library/Application Support/Adobe/Lightroom/Develop Presets

- Replace your user name where it says YOURUSERNAME. If you are not sure what it is, look at the right corner of your screen to see the user name.
- Drag and drop, or copy and paste the presets that you downloaded.
- Open Lightroom (or restart it if it was open during the process).
Windows Vista/7/8 users:
- Download the presets
- Unzip the presets
- Click on the Windows Start Menu
- Type run, and hit enter
- Copy and paste the following:
C:\users\YOURUSERNAME\AppData\Roaming\Adobe\Lightroom\Develop Presets - Where it says YOURUSERNAME, enter your user account name
- Hit enter
Note for Windows XP users, the File Path is: Documents and Settings\YOURUSERNAME\Application Data\Adobe\Lightroom
Folder Locations for Lightroom Presets on mac and windows
- Mac OSX: Macintosh HD\Users\\Library\Application Support\Adobe\Lightroom\Develop Presets
- Windows Vista/7/8: [C:]\Users\YOURUSERNAME\AppData\Roaming\Adobe\Lightroom\Develop Presets
- Windows XP: Documents and Settings\YOURUSERNAME\Application Data\Adobe\Lightroom
How to make it easier to Add Lightroom presets in the future
Mac Users – Add The Presets Folder to your Sidebar
if you know that you are going to be downloading, adding, exporting your presets a lot, you may want to make the presets folder Quickly accessible to you at any time.
- Locate your preset folder through any of the previous methods (or open Finder, and in the menu click Go > Recent folders > Develop Presets
- Click and hold the Folder Icon of the very top of the window right next to where it says Develop Presets.
- Drag it over to your Finder Sidebar wherever you may want it.

- After you’ve dragged and dropped the presets folder to your sidebar, you can also click and hold that folder in the sidebar to rearrange it if you didn’t get it exactly how you wanted it the first time around.
- Now any time you open a Finder window it’s right there for you to click on very quickly and easily.
Windows Users – Add the Presets Folder to your favorites
- Locate your preset folder through any of the previous methods.
- If you are currently in the Develop Presets folder, go back one folder so that you are in the Lightroom folder.
- Now that you can see the Develop Presets folder listed, go ahead and click and hold and drag-and-drop over to your favorites bar on the left-hand side.
- Now anytime you go to a Windows Explorer window, you’ll have quick access to the develop presets folder!
Lightroom has come a long way, and has come out with some amazing features for photographers. Adobe Photoshop Lightroom as a whole can speed up and simplify your photography workflow, especially when working with several images.
Lightroom presets take this a step further and allow you to add some amazing looks and effects to your photos very quickly. You will be amazed if you aren’t familiar with Lightroom Presets yet. Go on and start playing with them! Download some free Lightroom Presets, or create your own, to see a dramatic shift in your photography workflow!
