A lot of people unknowingly like and use the matte effect. Also, dozens of filters in Instagram, VSCO, and other media apps and websites, incorporate it.
This is because it is both incredibly versatile and easy to use. You can use it for many kinds of photos, ranging from portrait to black and white.
There is somewhat of a matte photography trend right now, and many people seem to enjoy the looks of a matte look to their photos. The matte effect makes the picture appear smoother, and it looks more faded as if coming from a film camera.
It helps that there are filters, and matte Lightroom presets, that are easy to use. But it is good to understand the principles behind this technique. It might help you learn some new techniques in Lightroom by creating this effect from scratch. This way you’ll be able to use these techniques in a variety of situations.
What the matte effect in Lightroom will look like
The following is the before and after of adding a matte effect in Lightroom. If you slide the slider to the right or left, you will see what the matte effect looks like.
How to Add a Matte Effect in Lightroom
- Open the Develop module
- Add two points to the Tone Curve
- Drag leftmost point up (lighten shadows)
- Drag topmost point down (lower highlights)
- Enhance the matte look with optional steps (contrast & vibrance)
Watch the Video, or skip ahead to follow along with the screenshots
1. Open the Develop Module
Let’s start by opening up Lightroom and going to the Develop tab. To create the matte effect, we’ll be mostly using the Tone Curve Panel, just below the basic options.

The X axis of the Tone Curve is divided into four segments. Starting from the left, those are the shadows, darker mid tones, lighter Midtones, and Highlights.
The Y axis represents how dark or how light the segments are. Dragging a part of the Tone Curve down will make that segment darker while dragging it up will make it lighter.
2. Add two points to the Tone Curve
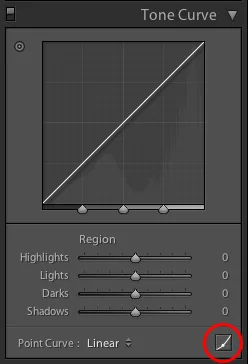
To create the matte finish, we will be editing the Tone Curve with the point curve, instead of the default region curve. To do this simply click the button on the bottom right part of the Tone Curve area.

By using the point curve option, you’ll be able to control which segments of the tone curve will be affected when you drag and alter it.
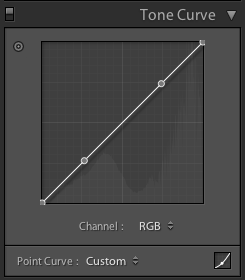
The matte finish makes the picture look smoother by making the shadows lighter. There will already be two points at both ends of the tone curve. To start, let’s make two points by clicking on the border between the shadows and the darker midtones (25%), and the border between the lighter midtones and highlights (75%).

3. Drag leftmost point up (lighten shadows)
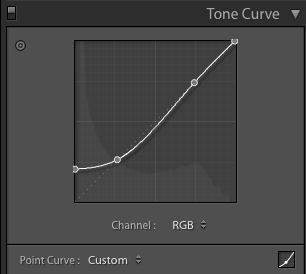
Using the leftmost point, drag it right about below the level of the second point. By doing this, you are making the shadows lighter and ultimately makes the picture look grayer and faded. This plays the biggest part in giving the picture a matte finish.

4. Drag topmost point down (lower highlights)
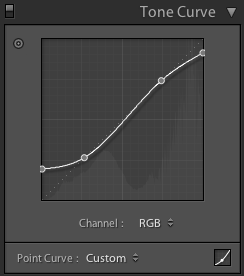
Doing that alone can give your picture the matte finish already. If you want, you can smoothen the picture a little bit more by lowering your highlights a bit. Drag the topmost point by just a bit, and there you go!

4. Enhance the matte look with optional steps (contrast & vibrance)
Your picture has a fantastic but simple matte finish to it. For an added faded effect, you can decrease vibrance and increase contrast if you like.
Final Tips for creating a matte effect in Lightroom
It’s easy to remember how to give a picture a matte finish. Just bear in mind that the technique is done by using the tone curve to lighten the shadows and darken the highlights. The process is very similar if you want to use Photoshop instead of Lightroom because it also gives you an option to edit the tone curve of the picture.
Use your best judgment: Just remember that this isn’t a strict policy to follow. You can edit the tone curve as you see fit because this exact process won’t be effective to use on all the photos you’ll be editing. Some might need lighter shadows or darker highlights.
It also depends on how subtle or how obvious you want the effect to be. Just understand the principles and technicals of the technique, add in some creative freedom and you’re all set.
Download this free Lightroom Matte Preset
I’ve created a free Matte Lightroom preset so you guys can have a quick and easy way to add a preset to your photos in the future. After downloading, you just need to install the Lightroom preset in the correct preset folder location to use it in the future.
Download now:
[emaillocker]Download Matte Lightroom preset [/emaillocker]


This is exactly what I was searching for! I just started using lightroom, and appreciate both the tutorial and the preset 🙂
No problem, glad you liked it! I’ll have to make more tutorials with included presets 🙂